Thursday, June 23, 2011

Ladybugs for my "Wadybug"

Actually, she doesn't say it that way anymore, but it was awfully cute when she did.  Now she's got a bit of a lisp due to loosing two front teeth--so cute!

She saw this fabric (which I did buy for her, but wondered if yellow was a good color with her fair skin) and, of course, she wanted something made from it--she LOVES ladybugs!  But then, I thought, what if I distract your attention from the yellow a bit by emphasizing the red?
I had seen "pillowcase dresses" somewhere and thought I could adapt a pattern I have, so this is how it came out.

First the pocket:  I drew a pretty wide "watermelon" slice, put two really deep darts at the rounded "corners", gathered the top, bound it with contrasting fabric.

image.png

I made the shorts of a lightly patterned yellow fabric from my stash, because the ladybugs show through the fabric.
image.png

back view
image.png

And the front--I like it, and so does she!
image.png

Her mommie likes it, too, but I did have to sit through a lecture  on 'maybe we need to find you some homeless people to make cute things for because her closet is BULGING!'  (Of course it is--I didn't really think she would still be able to wear ALL of the stuff I made last year...  And I just keep having really fun ideas!)   So I guess this is the last "regular" clothing of the season for her.  

(But I'm not promising on the princess dresses...)

Sunday, June 19, 2011

Purple Clocks


I had to change my storage "box" system for my sewing machine feet.  I was carting them around with all the spare ones in a small box.  I started using more and more of them, and having to tip the whole box out to search was no longer working.

I ended up with a box as big as the larger one for my serger feet, so my "sewing class bag" is now too small.  I have dithered around thinking about whether to make a larger bag, or use my serger class bag, but it is so huge that I truly dislike using it (although when I go to serger class I fill it completely up because I have more boxes when I use my serger).

I was not going to make this month's sewing class project (yet again... I'm getting a reputation), so I needed something I could work on during class that would allow me to listen and observe what they were working on.  I like to go to class, and normally I pick up several tips (although I have to say I didn't learn anything new last night).  Finally I decided to make a new mesh bag; this time I wanted it to "match" my purple rolling machine luggage/bag.

I browsed my "stash" and one piece of fabric kept coming to my mind.  I had thought I would make my grandson a shirt from it, but as so often happens, when it was washed it was a bit too heavy for a shirt.  Then I thought of making my granddaughter capris but never could quite decided what to do.  I had a piece of green mesh and using the two together just materialized from my muse.

I cut out the mesh bag and (as usual) mulled things around in my head as I was working.  I have been frustrated with having to take a whole purse into class where space is so limited.  All I need is my wallet, cell phone, and keys, etc.  I had purchased a small cloth purse/bag in Hawaii for the purpose of copying it, or varying it at will.  It's not very well made, but could work for flights (ID, wallet, tickets, cell phone).  So I decided this was the time to try copying it.

This is the small purse I purchased.   Front                                                Back
image.png    image.png

In this case, I wanted my purse a bit bigger, so I enlarged it slightly.  Here you can see how much I enlarged it (keep in mind that I mitered the corners on mine, so it does not appear quite a much larger as it actually is).
image.png     image.png

(Yes, my rolling sewing machine carrier is purple, and although I don't ever wear purple, I wanted my bag and purse to look nice with the carrier, silly...  I chose the purple bag because it is both my daughter and my grandson's favorite color, so for once I didn't choose red.)

To begin, I had to decide what size purse I wanted, then how many pieces were used to create the original purse.  Next I calculated the size for each piece of the fabric and the liner so the final purse would come out the size I wanted.  (And guess what, I did a GOOD job figuring that out, because it seems about perfect and each piece was exactly the right size!)

The real trick was deciding the order in which to put it together.  I cannot tell you how I figured out where to start--it just seemed right, but the answer is:  Start with the TOP zipper and work your way down and around to the back opening, attaching the liner/pocket fabric at each step of the way.

It really isn't too tricky, because in the end after sewing the straps in place and attaching the key holder, you pin down the straps and the key-chain holder, leave the upper zipper partially open, sew around three sides, serge those sides, turn it right side out and it's done!   Pretty amazing.  

I had already cut the pieces and fused light weight Pellon to the back of all the exterior pieces.   I sewed the whole purse during my class (except I had to serge it when I got home), and I still had some time to work on the mesh bag.

Finished bag front  
(Next time I will use the longer zipper (12 inches) for both.  It's easier to install and you don't have that tricky seams at each end.  On this one I used a 7-inch zipper for the upper opening.  A 10-inch might work, but I think it would be a tad too short.)
image.png

Back side of the bag with the open pocket
image.png

Key-chain holder  
(With a shorter zipper, it is sort of buried, so it should be a tad more to the center of the purse, but with a 12-inch zipper it would have been fine.)
image.png

Now for the mesh bag
image.png

Filled with my boxes for class
image.png

Inner pocket for pen and tissues
image.png

perspective
image.png

All ready for class!

Friday, June 17, 2011

Capris and House-Pants for Summer (for me)

This small piece of fabric was not quite long enough for capris, so I turned the stripes to horizontal and made a small cuff at the bottom.

image.png

And I finally finished this really light-weight, cute fabric.  I use the two full-length pairs I made last summer all the time when it isn't cold outside, but this is even lighter weight.  I will probably sew in them, then maybe later they will be jammie bottoms.  I just couldn't resist the fabric design.

image.png

image.png

In both cases I used a slimmer-in-the-leg pattern than I had used last year.  Last year's are REALLY wide; I think I'm going to like these better.

I have some other fabric I want to make into similar items, but I do not wish to make them in such a large size, and I keep hoping...

Tuesday, June 14, 2011

More Confessions

I really dislike personal whining on here, but it might be a good idea to explain at this point that I am extremely sleep-deprived, which explains an awful lot of the dyslexia and stitch removal going on in my life at this point.

It also explains the fact that I did a great job of correcting her "butterfly dress", then took it to her house without getting a photo (after I had pressed it, too!)  Hopefully I will still get a photo sometime.

I am not QUITE as idiotic as I sound, really...

Hopefully I can soon go back a dopamine balancing supplement that was doing a great job of helping me rest.

'Nuf said re my health issues...

Sunday, June 12, 2011

Lightweight and Cool

I find myself continuing to struggle with finding appropriate knits for things I want to make.  Also, I continue to find various challenges using cover stitches on knits and various other aspects of working with them.  So I keep trying to work on a really regular basis with the techniques and fabrics until I feel I have truly conquered them (if that ever happens!)

I found this really light knit on one of those tables of pieces of fabric at Beverly's.  (They almost always have a piece or two I'm interested in).  The pattern was fine for both grandkids, and of course the color is perfect!

Their mommie usually buys Hanna Anderson's for them.  I think they are pretty awesome, but the fabric is the same weight year-round and it's fairly heavy.  I wanted to make something similar, but light weight, and after five years or so I've finally done it!

Hint:  Be sure your needles are SHARP!  One of these hems has a funny sort of "break" about every two inches, caused by the fact that I needed to change needles and did not know it.  And one leg hem I had to completely pull out because on the the needles threads had broken; I had the stitch length set too short on that one and it was not fun to remove!

By now, you will know that I really get into the challenge of matching stripes...  Unlike the "apples' nightie I made a couple of weeks ago, this stuff is quite stable.  I would never make stripes in ultra-unstable knit.

image.png

V-Neck for him:
(I will always wish I had made the front "vee" with the opposite side on top, but, oh well...  That side matching was not intentional on the neck binding.  Since it was cut on the bias I was surprised it all came out looking like this.)
image.png

Longer shorts like Hanna's
image.png


Round neck for her (I should have tugged those front curves a tad tighter--it is sometimes really hard to gauge, because you don't want to "draw up" the top.)
image.png

Finished!
image.png

I always mark the front inside the shorts so they can tell which is front and back--usually I use a tiny satin ribbon.  In hers I make a tiny bow and in his I make a "loop".  This time it will also help their mom know which ones belong to which child...

======

Later:


They fit, and were pronounced "soft", so another success story.

I asked their mom if a full-length pair of pants to match would be a good idea as they are so light weight--good for our weather.  She thought so, so here they are:

image.png

(I think I need a pair!)


Saturday, June 11, 2011

Do it right the first time!


Sometimes you win, sometimes you don't!

A couple of weeks ago, I did a post which included a skirt of coordinating stripes, etc.  At the time I thought I had only a tiny bit of fabric left, so I sewed it up.  Then I looked at it and thought, "that's not going to work".  However, I gave it to my granddaughter thinking I could perhaps fix the too-narrow second tier by simply shortening the first tier.  I probably could have, but then she could only have worn it this year. 

This week it came back again.  My daughter said, "she can't walk in it!"

Original post:

This is what it looked like the first go-round.  You can see the proportions are wrong.
image.png

When it came back I re-visited the leftover fabric and discovered that I did have a bit more of the stripes.  Initially I forgot I had to have them in the ruffle, too, but I was fortunate--there was JUST enough.

Then I removed the elastic enclosure stitches at the top and took the side seam out, as well as a "sort of dart" I had put on the opposite side down to the first gathered ruffle (tier 3).  I had thought that "dart" might help the perspective, but no...  (And even if it had, she still couldn't walk in it.)

I opened the hem stitching for about 3 inches and repaired the rick rack (I also had to add a new little piece where the "dart" had been (oh my, what messes I do get myself into!).

I ended up creating another "skirt"--just the size of this one and stitched them together; fixed the hem, put the elastic enclosure back in, and here it is.  NOW she can walk!

This is the "bunched" version of the much better skirt.
image.png

Here it is "laid out" as much as I could.
image.png

She immediately "twirled" it.  Success!

Between this one and the red-and-blue one, I think she has enough twirly skirts for the time being.

They say craft blogs are for "telling it like it is" and I try to do so.  I sincerely hope this will be the last post for a while which is forced to tell the sad tale of my human failings...

Have fun and be honest!  It's all ok.

True confession is good for the soul, or so they say...


Background:  Last year I made my grandson a purple sparkly "tooth fairy bag".  It wasn't very impressive, but he liked it.  (I don't think I have a photo.  It was another urgent project.)  

His mom said his sister would need one exactly like his (except for color, of  course).  I promised I would make hers, so I cut the same fabric out in pink and set it aside for "when I got around to it".

She reminded me a little while back that the 5-year old had a loose tooth.  Early this week, she told me there were now three loose teeth and one was getting pretty loose.  I had a class on Friday and a haircut, so I promised I would make it Saturday.   I had seen the little bit of fabric not very long ago, so it should be quick and simple, right?

Yesterday (Friday) at dinnertime, my daughter called to say the bag would be needed before bedtime!

I was deep into the remainder of my project I worked on in class, but I quickly put it aside and scrambled for the tiny bit of fabric (keeping in mind the fact that her favorite color changed from pink to turquoise in the meantime.)  I could NOT find the pieces anywhere in the tip my space had gotten into while flying through so many fun projects!

Back to square one, and time is FLYING!  They go to bed pretty early, too, but since school's out I told my daughter she might have to keep her up a tad late.

I scrambled for a cute piece of fabric you've seen on here earlier--I made a 2-year old a little dress from it this Easter.
http://nanabs-sewing-fun.blogspot.com/2011/04/two-year-old-was-coming-to-easter-lunch.html

I was so desparately in a hurry that I abandoned all my normal "frugal" fabric tendencies and cut a chunk out where I could get the only bright turquoise sparkly butterfly in a large space.

I cut "interlining" for it, and then commenced to go COMPLETELY dyslexic--much worse than I usually am.  I couldn't picture my way through the process apparently and first I did the applique of her name and "tooth fairy" on the part of the bag that would become the INSIDE.  I left her name, but ripped out the rest in case it would show somehow...  (In too big a hurry to think anything through at this point, and obviously completely thinking-inhibited anyway.)

I then carefully laid out where the words actually WOULD have to go and applied them.  "Name, Tooth Fairy, and "Bag" are the three lines (it's a NARROW tiny little bag).

I got the words on and carefully stitched the end together, leaving room to pull it through to the right side afterwards.  Did this, and I had a long triangular thing--NO BAG AT ALL!   And time is FLYING.....

I had two problems.  It had to be a bag, and it had to have a drawstring (which was going through the buttonhole I had already applied before appliqueing all those words!   How was I EVER going to accomplish this, in any amount of time, never mind in the time before she had to go to bed!

The solution to the "bag" problem was to hand-stitch each side firmly!  (I actually did it twice--too complicated to try to explain.)  Then turned the bag wrong-side-out and handstitch the binding tape to the inside of the bag--the ONLY way to get in there, and the only way to keep a channel free to run the drawstring all the way around.

When I was still stitching side two, my daughter and granddaughter showed up to collect the bag.  She LOVED the pink sparkly fabric and really loved the turquoise butterfly on the back.  But Nana kept on stitching...

I used somewhat heavy polyester thread that I usually only use for stitching mesh bags and things which really require tough thread.  I stitched it down, and I HOPE it will hold.  I inserted some really cool sparkly polyester cording I found at Joann's one day and picked up for Little Miss Turquoise, just in case--what a hit that was!

My only photo of the bright turquoise butterfly on the back has her beautiful face in it, so I had to trim it.

image.png

And here is the front.  She's glad I lost the other fabric--she loves this!

image.png

It was at least 30 minutes past even her summer bedtime when they took the bag home for the Tooth Fairy to put a gold dollar coin in sometime during the night when fairies pay their visits to mortals.  She was about falling asleep on her feet, but she was happy, her mom was relieved, and I was exhausted!  (The exhaustion was not their fault--it was entirely my own fault.)

All I can say is this was a prime example of the old adage, "If it CAN go wrong, it WILL!"  

Also, "All's well that end's well."

Wednesday, June 8, 2011

Thinking Out Loud

This afternoon, while my daughter and granddaughter enjoyed the beaded things, the new purses, and outfits, I changed all of last year's shorts elastic to the next larger size.

Each year I make the elastic at least 3 inches longer than required.  Then I sew where it is right for this year, and add 1-2 more sets of stiches about 1/2-in. apart.  All I have to do when she grows is go in an clip the tightest set of stitches and close the waist back up again.

I did about 8-9 pairs of shorts and two pairs of capris pretty quickly.  Her mom brought everything I had sewn for her last year so I could pull out what I needed.  It was an impressively large stack, most of which she can still wear.

Her last year's "butterfly dress" was not right to begin with, so in order for her to wear it again this year I will open up the shoulders and try to remedy that.  She LOVES it and will wear it too small, which will really bug me, so I'll just fix it.  That will take a bit of time to figure out and implement.

Now my question is this:  since she can wear all of those clothes, and all of the new ones I have made her this year, just exactly what else can I make.  Her closet is bulging!

I have already promised a pair of jamies so those will be first, but after that--maybe PRINCESS DRESSES from my latest find (yes!)--or maybe I should just get on and finish the quilts!!!

Last year I made her brother "cowboy" jamies and she really wanted some, but "with cowGIRLS Nana!"  The only soft fabric I could find with cowgirls was Betty Boop.  She saw the fabric today and told me straight away it was Betty Boop.  I asked her how she knew it was Betty Boop and she said "from Popeye, of course!"  She went on to tell me a long tale about stuff Betty Boop did on their Popeye video...

I do have some light weight knit I want to make into jamies for her brother (and maybe her as well), but it's summer and the Princess Dresses COULD wait until I finish the quilts--ummm..... is my conscience screaming yet?

And then there are grandkids to play with and pools to swim in if the weather ever warms up...  Oh my, I can think of a dozen things!  So if I'm not on here too much this summer, you might want to check my quilt blog and see if anything's happening on there.

Today I received my "photography" lighting and I am hoping to make better pictures as soon as I figure out what to do.  (I am sure everyone will be pleased to no longer hear my whining about my photography troubles!  I especially hope the lights and umbrellas will help me make some better photos of all my quilts, but that will mean I have to steam press NINETEEN quilts--did I say it was summer???!!!


Tuesday, June 7, 2011

It started out as a skirt.... (and then it grew) -- and yet another truly poor pattern

I had an itch to divert from the projects I was supposed to be working on and trying to make the actual skirt I had based an earlier version on.  

I wanted to cut out what was required, but after studying the pattern pieces themselves and then the instruction sheet for quite some time, it was clear that they had NO idea what they were actually trying to describe.  This one brings lousy instructions to yet another low...  (I hate to be negative, but really....  I feel SO sorry for people who are just learning to sew.)

Finally I decided to begin with just one set of the instructions and see what was needed after that.  My idea worked fairly well, as it turned out.

I altered what they said to do and cut.  The photo on the pattern showed every tier of the skirt was gathered to the previous one.  The cutting instructions for tier 2 were ok (but the number of strips was totally wrong), and the cutting instructions of the bottom tier (or ruffle) were almost correct for what I actually did, but TOTALLY incorrect for the skirt pictured on the pattern AND for the instructions on how to make it on the inside.  The cutting instructions were closer, but still not correct.

The instructions for tier 3 were interesting.  They told you to cut the number required for how I made the skirt--which is no where near enough to gather it to tier 2.  (Now if you are feeling somewhat "lost", please get in line behind the whole long queue of which I am a member...)

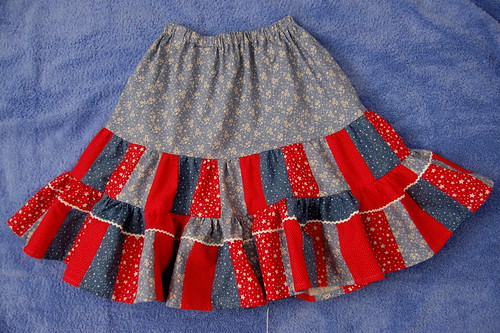
Once I had cut tier 2 and 4, it became much clearer what to do about tier 3.  Tier 4 (ruffle), when cut as they directed, is not sufficient for gathering it to tier 3, but it is already over 4 yards around.  If you made it like the picture and the instructions (not the cutting directions), it would end up 10 YARDS around the bottom!   I do not know how many pounds it would weigh at that point, but I'm sure my granddaughter would find it awfully heavy.  

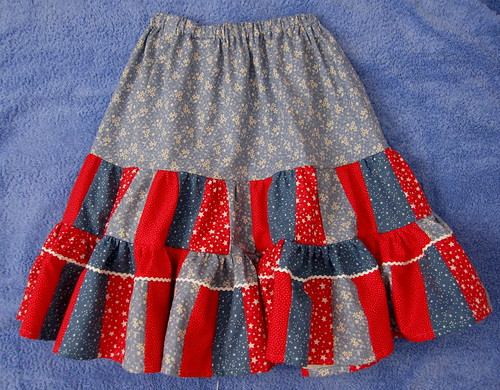
My solution was to gather tier 2 to tier 1.  Sew tier 3 to tier 4, apply the baby rick rack and hem tier 4, THEN gather tier 3/4 to tier 2.  This photo shows how it turned out.


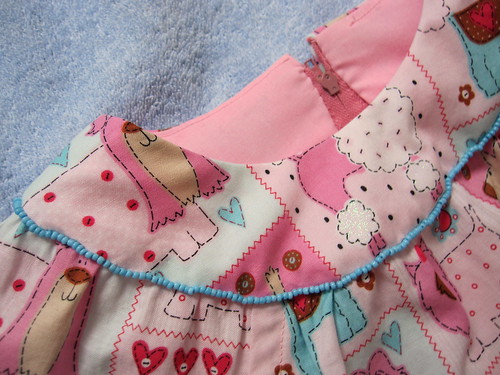
They showed rick rack on every tier of the skirt--including at the hem--on one view; none on another view.  I had already determined that too much rick rack was going to be all in-your-face rick rack with these fabrics, so I knew I was not going to do that much.  But I really needed to de-emphasize the seam where tier 3 joined tier 4 without gathering, so I chose to apply one row of tiny baby rick rack, and I like the way it turned out.

The skirt

Just to show you how truly full it is this way, here is a "spread-the-skirt" photo.  You can see that it is PLENTY full enough for her favorite twirling!

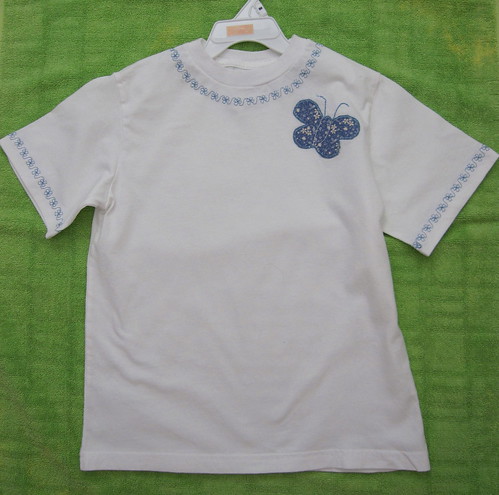
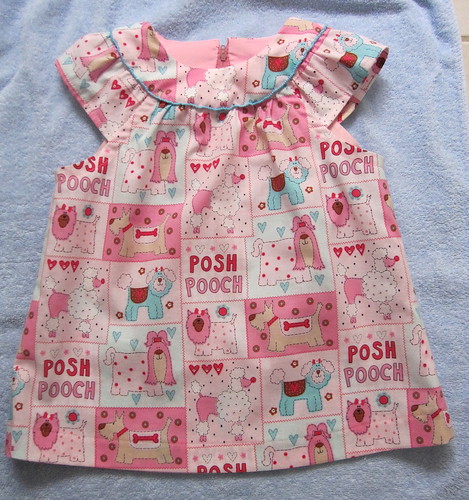
As I was finishing it up, I kept mulling over more things.  The pattern showed how to decorate a store-bought tee shirt and included a butterfly pattern.  Finally I pulled a new tee shirt (already washed and dried) from their "staying at Nana's" supplies, and decided to play around with it.

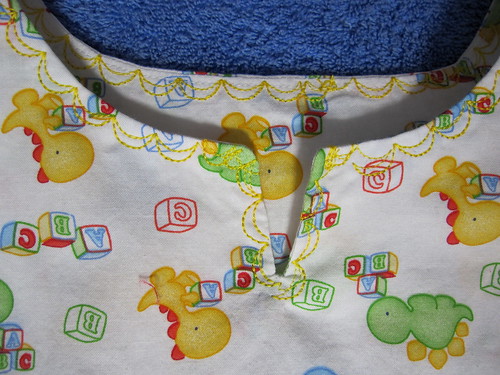
First I applied the decorative stitching around the sleeves, using wash-away stablizer.  That went pretty well, so I put it around the neck, too.  (I was afraid the neck stitching might be a tad itchy, but not nearly as much as the store-bought ones which have really scratching stuff all over the back of appliques.  She will not wear anything that scratches.)  
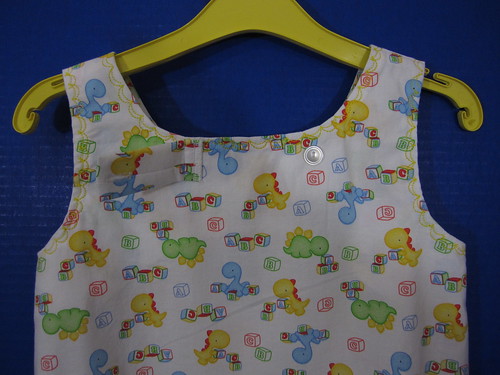
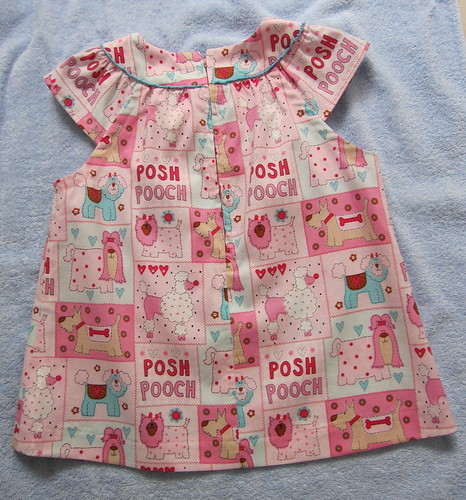
Back view

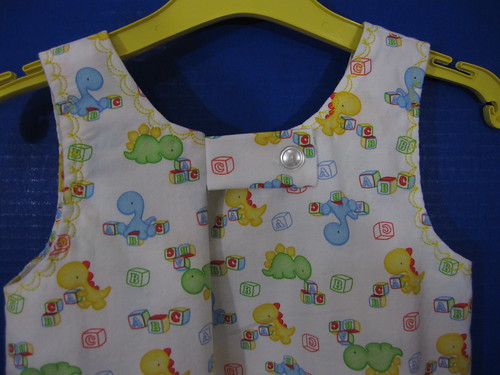
Then I used used Steam-A-Seam 2 and cut out the butterfly, then steamed it to the shirt.  Using wash-away stablizer, I appliqued the butterfly to the shirt, added the body stitching and antenna, and wha-lah! 


After using the Wash-Away stablizer, I ran water over the back and rubbed it with my fingers in a sink of water.  Very soon it was all gone, so I dried the shirt.

One outfit...

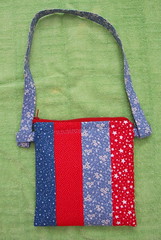
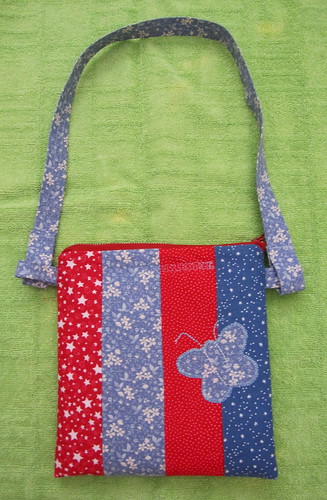
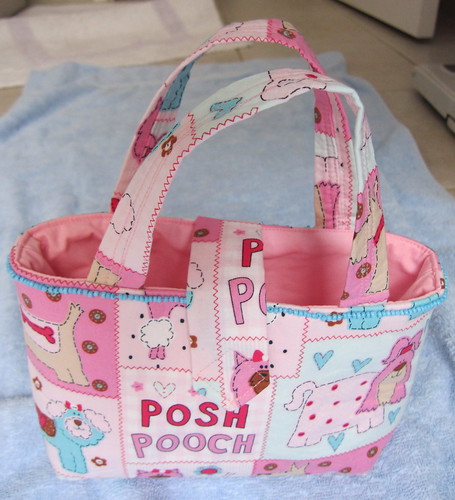
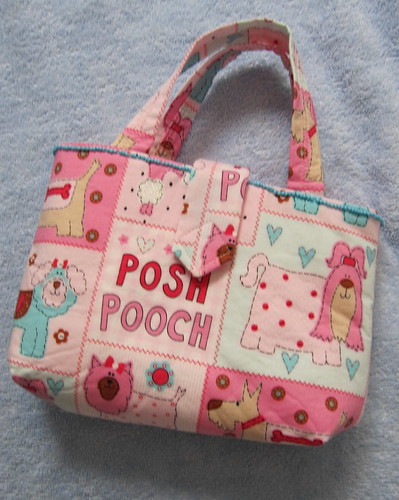
When I had finished the skirt, there was one partial strip of the four fabrics left over.  It just kept screaming "purse" at me, so finally I gave in to the impulse.  I made this one up and getting the turn-it-to-the-outside could have been tricky with the zipper, but I figure it out correctly!  

It is lined with the same fabric as the butterfly and tier 1 of the skirt.  I used light weight iron-on pellon on the outside purse fabric and iron-on fleece on the lining fabric.  I didn't do the best job on the strap attachment, but it's fine for the what it will be used for (mostly hauling around fuzzy animals, sharks, etc.)

Back of purse
back of zippered purse

(I should have taken a proper shot of the zipper at the top, but it went home with it's happy owner this afternoon...)

Purse front

And the completed ensemble...

Pretty cute, if I do say so myself!  

And she LOVES that she can twirl and loves the purse, so that's real success.

Simple little nightie from another bad pattern

This pattern was bad last year when I made a something from it.   You were supposed to be able to put your head through the neck opening with no slits of any kind.  I made it and had to add a placket with buttons to the back of two items.   See http://nanabs-sewing-fun.blogspot.com/2010/06/hearts-all-over-place.html

This time I decided perhaps a slit in the front of the neck would solve the problem--knowing full well from the design that this might make it slip off her shoulders.

Well, it DOES fall off her shoulders, and this time it's a pain to fix.  I had already slitted the front, and done the decorative stitching.  She likes it so I will have to fix it, but I'm not sure how I can do it.  I'm considering a buttonhole at the back neck, with a button to create a "pleat".

Neck detail, as it is now

I put the decorative stitching around the hem, but my turned up hem was wider, so I added a twin-needle "cover stitch" on my sewing machine.  Final effect

Complete (but not finished)

----

When I finally got to try it on her, once again, it did not fit.  If this pattern goes over the head, it falls off the shoulders.

To cure the falling-off-the-shoulders, I added a button (well reinforced underneath) and a tab with button hole.

Buttoned

It's cute and quite soft, so she loves it (and her Nana still really dislikes the poor pattern design).  I had added the front slit to accommodate the head, but it's just a poor design.  I should throw it away, but it's got some basic elements which can be adapted, so I keep it.  (I might regret that.)


Sunday, June 5, 2011

Posh Pooch

I wanted to try out a new pattern and use this fabric I got last year.  I think she's going to like it!  It is very light weight so will be nice for summer (if it ever arrives!)

As I began working with the fabric and pattern I decided to use some glass beads I recently got for $1.00/pack at Beverly's.  I don't know if that's a good price or not, but it seemed reasonable, so I got several packages--making sure I got some turquoise--her new "favorite color".  This fabric matches them perfectly and they help break up the pattern.

I had not applied beads to anything in nearly 40 years and never to anything that really mattered how it turned out.  (Back then I was putting clear/colored beads on Christmas stockings.  I must remember to take photos of those and post them some day.)  

Of course I checked the bead attaching techniques in my serger manual, but their method for attaching single beads was not what I needed for this project, so out came the needle and thread for several hours.  

At first I could not make the beads line up properly or stay near enough together, but after about 4-5 inches I began developing my own system for applying them.  (Of course, if I hadn't been so busy sewing on beads I could have searched the internet for suggestions.  Instead I worked out a stitching method that worked pretty well.  I'm not sure I can describe it properly, but I'll try.  It is called the "back stitching" method.  I have now done a little search and I am actually using a more secure way of attaching the beads than those I have seen on-line. 

  • First I sew on one bead.  Then I put the needle through that bead and add another bead, then I sew backwards to the beginning of the second bead. 
  • I repeat the process, but after the second bead is attached, I insert the needle and pull the thread up completely and BACK TOWARDS the previous bead.  THEN I add the second bead, sew backwards, and repeat.
Of course I used all the hide-your-knot and thread tricks as well.

Close-up of the beading - I am pretty happy with most of it now.

Front view

Back view with zipper--I added the last half-inch of beading after the zipper was sewn in.  I stopped the beading at the row of vertical stitches for the zipper.  

There as also a little bag pattern included.   Several little dress patterns have various patterns for bags, but this is the first time I decided to make one.  I thought she'd enjoy the fabric and I like this pattern.  

I used light weight iron-on pellon on all of the pieces (including the lining).  I then added iron-on fleece to the back the outside fabric to hold the bag upright.  You can see how well it stands on it's own.  The pattern did not have the little velcro tab, but I thought it might be useful.  (She likes to haul her fuzzy animals around sometimes.)

For fun, I added the row of beads to the bag as well. 

Bag front view

She may rarely use them together, but she can if she want's too!

Can't wait to give this to her.  Her mommie is going to love the beading.

[Next summer I will add a ruffle around the bottom for extra length.]

And, guess what?  I ordered some photography lights and full-spectrum bulbs as well as a 90-degree angle arm for my tripod to see if I can get better pictures of all my projects!  Can't wait to try it out.