Friday, April 3, 2020

Mask - 2 piece - virus (COVID-19, etc.)


These Instructions are an attempt to show very inexperienced persons how to make this mask.  There are MANY different versions of masks one can make.  I will be posting more versions very soon.

Materials requirements:

Cotton fabric, washed in very hot water and dried in dryer on hot
2 pieces - each 8” x 8-½” - EACH CUT FROM A DIFFERENT FABRIC
(important for wearers to know which side is already contaminated)
Elastic (soft if you can get it) - 
¼” or ⅜” wide, (two 7 inch pieces)
Scissors
Thread
Pins
Sewing machine
Steam Iron preferred, not mandatory

Directions: 

(I use a “3” stitch size throughout.  “2.5” is ok, but harder to remove if needed.

Version - Pleated with no pocket, no pellon - may be worn alone or over a “real” mask

  1. Choose two contrasting fabrics. 
  2. Prewash the fabric on Hot if you can (important but not essential).  Dry on Hot.
  3. From each piece of fabric, cut ONE 8” x 8-½” square.


  1. Place the two pieces of fabric with the right “nice” sides inside. Using two pins, pin the stacked layers together.
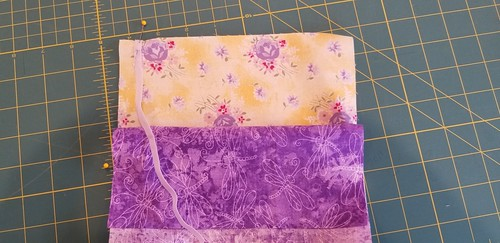
  1. The 8 ½ inch edges are the “top” and “bottom” of the mask.

  1. Fold back one of the 8.0 inch sides of the top piece of fabric a few inches. 

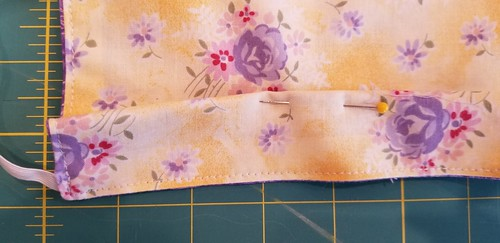
  1. On the bottom piece of fabric, along the shorter 8.0 inch side, pin each end of the elastic as shown in photo below (place the elastic flush with the raw edge of the fabric.)


REPEAT on the other side with the second piece of elastic for the second ear loop.

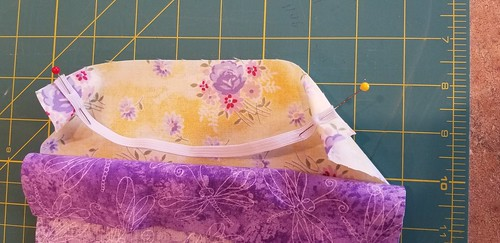
  1. Pin along ALL the seams, sew ½”  seam almost all the way around, leaving a ~3.0 inch opening.  The red pin in the center is where you will leave an opening so you can turn the fabric right side out after sewing the seams. Be very careful to keep the rest of the elastic away from where you will sew the seam (push or pin it further into the interior.

    The first photo shows how the elastic fits inside the seam.  

The second shows it fully pinned with the red pins (at the bottom) marking the opening you will leave.  

The third photo shows fingers in the opening you must leave.

[If you are experienced, you won’t need to pin it quite as much, but the “wrinkle” on the sides where you will sew the elastic works better if you pin a bit more than usual.  It also helps keep the elastic “ ear loop” from getting under the needle.]

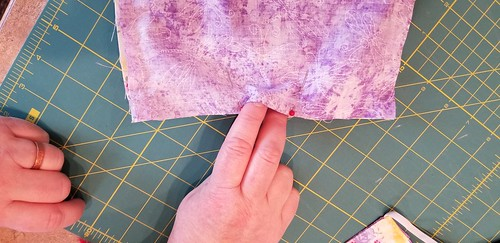
  1. After stitching, snip a tiny triangle off each corner before turning, leaving at least ¼ inch wide area of fabric in the corner (i.e. don’t cut too close to the seamed corner.)  This photo shows the sewn seam and the snipped corners prior to turning to the right side.
  1. Trim any loose threads, including any from the open area of your seam.

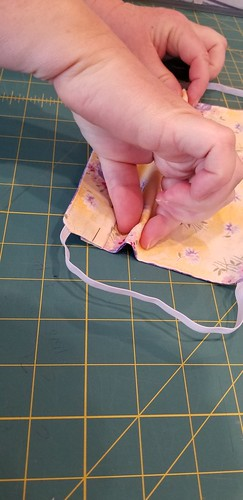
  1. Insert your hand inside the mask and pull the fabrics through the 3.0 inch opening.
  1. Using a pencil or similar pointy thing, poke the corners out from the inside nice and sharp as you can.

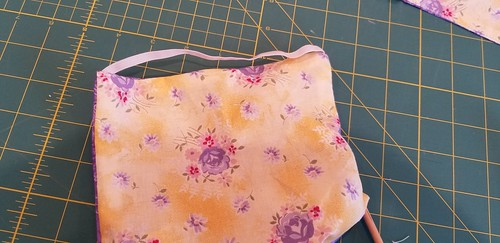
Now you are looking at the nice sides of both fabrics, and some elastic ear loops.

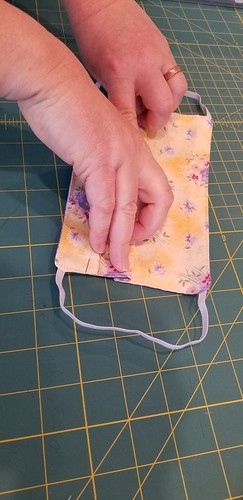
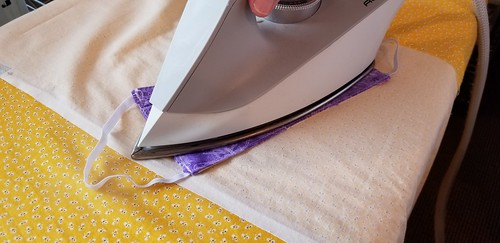
  1. Iron the mask super flat if you have an iron.  (This photo of the ironed mask shows the way the elastic should appear at the corners of the mask.  In the center at the top of the mask you can see where you will flatten the area that you left open to turn the mask to the right side to prepare it for stitching.)

  1. Keeping seams pulled “out” (not tucked in) press down the mask, making sure those corners are nicely pushed out and the “open” area is nicely matched to the rest.
  2. Top stitch about ⅛” from the outside all the way around the mask, overlapping first stitches about half inch at the end. You are welcome to add extra stitches over the ends of the elastic, as they will be under tension when mask is in use.  (You may do this by reverse stitching about three stitches over each place the elastic comes through the seam.)
  1. The slightly longer side is the top part of the mask.
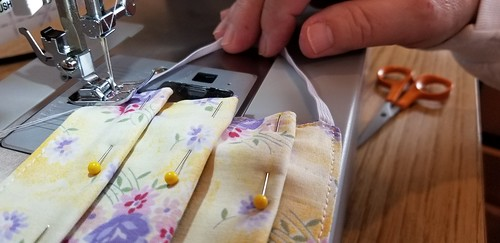
    1. Make 3 pleats, approximately 1” apart and ~½” deep, all going the SAME direction.  Pin as you go; also pin in the center. It is easy to pinch the pleats up with your fingers, then mash them down to make the pleat. Then pin in place. The mask should now be about 4 inches tall and about 7.5 inches wide.
      1. Making the pleats (please see ii. for way to make a pleat)
        1. Pin as you make the folds


      1. Making pleats  (this shows the method on the 2nd pleat)


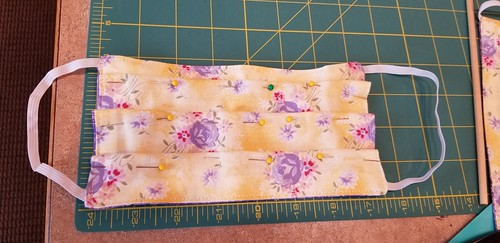
      1. Fully pinned pleats, ready to sew.  At this point, the mask is about 7-½” wide by about 4” tall.
    1. Iron firmly on each side; try not to melt your pin heads; you can just press between the area with the plastic pin heads.

  1. You are about to stitch down your pleats. At the sewing machine, be SURE to have the folded pleats pointing at YOU. About ¼ inch in the from each edge, stitch down each side once to hold pleats in place.  (mandatory step)

    1. First one side (two views)  Sewing DOWNWARDS over the pleats!

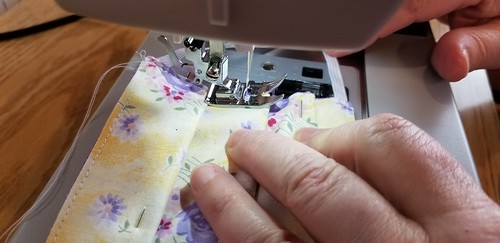
    1. Then the other side (again stitching DOWNWARDS over the pleats)
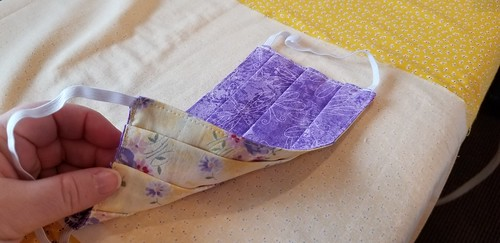
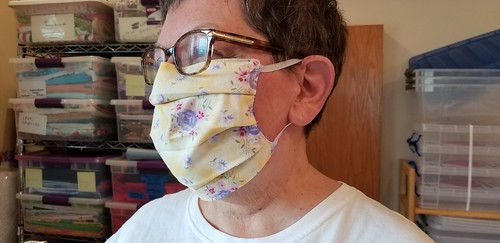
  1. Finished mask


Congratulations!  You should now be able to help both yourselves and others by making this mask.

Monday, April 8, 2019

Coated Nylon bags - Waterproof fabric


These bags are very easy to make.

First determine the size bag you want (width and depth).  For example, 6" x 9".  Then multiply the depth by 2 (i.e., 6" x 18").

Add 1-1/4" to each of these dimensions.  (i.e., 6-1/4" x 19-1/4").

For this size example, cut one piece of fabric 6-1/4" wide x 19-1/4".

Fold the strip of fabric in half (6-1/4" x aprx. 9.625") with the outside of the fabric towards in inner side.

Next step:  sew in your zipper with the zipper pull facing the outside of the fabric.  (Make a very short seam (about 1/4" long) on each end.  Sew the zipper into the space between the two short seams.  If your zipper is longer than the bag, that is okay -- possibly even preferable.

OPEN the zipper enough to be able to put your hand through to the inside (the outer fabric).  Then sew down each side.

When sewn, pull the bag out through the zipper so it is right side out. 

[Sorry, maybe next time I will take photos through the whole process and write it up properly.]
.
End result:

Monday, April 1, 2019

Geometrics make a cute top!

After much searching over a long period, I decided to make my own top.  I was fed up with wearing solid colors (mostly white and black) with very little variation.

Our local Benjamin Franklin store had a bolt-end of this fabric (I think it was just over a yard, but may have been less).

I had a top I quite liked, except I wanted it a couple inches longer.  So I made a paper pattern from the store-bought top (tricky to get right, but I did).  Laid the big print out to center a big "stripe" down the center front and the center back.

After cutting, I serged the shoulder seams and side seams.  Checked the fit -- it was good.  Pressed the seams.

Then I cut some fairly-diagonal strips to make a binding for the neck and armholes.  Stitched the strips and pressed the seams.  Then folded the strip and pinned it together.

NOTE:  In my opinion, it is ALWAYS tricky to stretch just the right amount when sewing binding to curves!  If you stretch too hard, you get crinkles around the curve in the garment.  If you do not stretch enough in the deeply curved areas, the binding will flop out like this:


Please note it is doing the flopping in the center front AND in the back as well where the curve was much more gentle.  (The sleeves came out well because you sewed the binding down, then turned the whole thing inside and stitched.)

I had zig-zagged around those curves, then serged the binding onto the top, then placed a row of stitching on the top to keep the binding flat.  (Until I stitched the top I could not be certain it was not acceptable).  Had I attempted to remove all those stitches I was certain the top would have become so distorted that it may never be okay.  So I came up with a "cheat"--I wasn't certain how it would work, but it did okay.  Now I just have to see how it wears over time.

My solution was to go into the front neck below the "cross-type" design.  I put in a thread on the back side, pulled it up through the binding, and put a row of stitches around the part of the neck that needed to be tightened.  I did the same thing on the back neck.  I sewed through to the inside of the neck fabric but no stitching goes through the outside layer.  With each stitch I pulled a little bit, trying to gauge how much I needed to reduce it by.


If you look closely on the back of the neck you can see the stitching where I pulled it just a little.  On the back I should have pulled it even a bit more, but it is okay.  The front came out acceptably.  I wish I had done it the right amount in the beginning, but this is an okay option.  I think you can hardly see the "puckering" around the front neck.  I wonder how it will wash???

[Better luck next time.]

Saturday, March 30, 2019

Sweet Pea wants a warm fuzzy "bankie"

My granddaughter loves sleeping under the lovely, soft, "throws" made from faux sheepskin on one side and deep fleece on the other.  They make over-size ones (i.e., a bit longer and wider), but I have been unable to find a twin size one.  She has outgrown the length of the throw.

After searching high and low for fabrics exactly like our great Costco throws, I gave up and purchased some very soft fleece for one side and some 'short, curly, furry fleece' for the other.

I bought 2-1/2 yards of each fabric.

I serged across the messy ends of both fabrics.  Then I washed them in the washer and dried each in the dryer just in case there might be any shrinkage.

I placed the outsides together and pinned them in place.  When pinning, I pulled the patterned fleece a tiny bit tighter than the curly one in order to keep the patterned fabric from showing on the curly side.  (I did not care that the curly one would show on the patterned side.  Then I serged around the edges, leaving about 12 inches open to turn it.

When I had turned them I was not surprised to see that the curly-type fabric had stretched out enough so as to make it wider on one end than the other fabric.  I turned it back out and on the side where it was too wide, I re-serged about half way down the side of the blanket--thus making another nice straight line with no excess.  (No need to remove previous serging.)

I turned the blanket again, matched up the opening and because of the curly fleece, I decided to blind-stitch the opening by hand.

I then laid the blanket flat and pinned all the way around the outside edge.  I then stitched a row about 1-1/2 inches from the edge all the way around (to keep it from rolling and balling up).

I was very tempted to put some more quilting-type stitches in the center to hold it all in place (it's pretty heavy and very slippery).  I decided NOT to do this because my granddaughter loves things that are all soft and fluffy--stitching might make it not quite so soft in that area.

Granddaughter had gone on vacation, leaving her sweet little lama with it's head on the pillow and under the throw.  So I placed the lama as she had, and put the blanket on the bed.

I intentionally did not make it all smooth and flat.


The back side looks almost like paw prints but is really little flowers.


Bottom line is:  she LOVES it!  (And I'm very glad, because that fabric cost a lot more than I thought it should._

Monday, January 7, 2019

Covering more pillows

I may have to be on break for a while again, so I'm posting this little chore for the day.

My daughter had purchased four pillows at IKEA, but the color was all wrong.

She found some material which pulled together her butter-yellow leather couch and chairs with her gray heathery couches.  It was a quick job; I did not make them removable for washing as by that time my daughter will likely want to replace them.  (IKEA fillings aren't going to last that long, and she likes to change things around.)

These will go on the couches with the "animal" pillows in a previous post.

It was an easy chore.  The most time consuming was getting the pieces cut out with the design centered and matched.

The fabric is quite nice (Waverly) and slightly loosely woven (which actually makes the job of turning corners easier).

  1. After cutting the pieces, I serged all the way around each piece as it tended to ravel.
  2. Then I put the two outsides together and sewed one long seam around the long sides and one end.  Stitched that seam twice.
  3. Trimmed the corners I had sewn.  
  4. Turned the case inside out.
  5. Pushed out the two corners until they were square.
  6. Inserted the pillow.
  7. Folded the seam allowance in on the open end and pinned it in place.
  8. Hand stitched across the open end, using a blind stitch.
  9. Repeat for the other three pillows.
  10. Done!
The photo only shows two of them.  All four are identical.


Should the need arise, I could pull out the blind stitches and remove the pillow.