For years I have wanted a better method for sewing straight stitches which show on the outside of clothing -- especially when I want a double row of stitches.
I did not think this up on my own -- in fact I am rather late coming to it. I saw something similar online and I tried it. I'm pretty happy with the results, especially as this was thick fuzzy-backed fleecy sweatpants. They came much too long so I hemmed them.
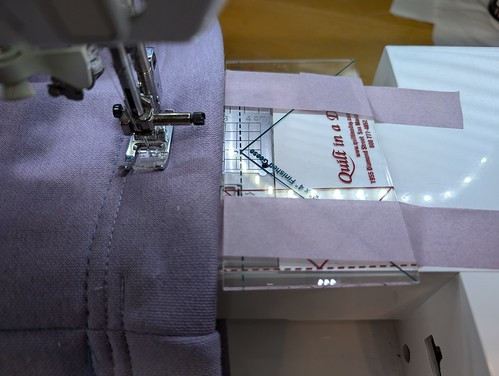
I had a small retangular, rather thick plastic quilting shape. It needed to be small because I wanted to take the arm off so I could sew "around" the bottom of the pants legs easily.
First I marked and cut the pants legs to the length I wanted (plus a deep hem). Then I serged around the bottom edge of each leg so it would not be messy. (It was way too thick to "turn under" again to hem the pants.)
Next I sewed a basting stitch all around on the edge that I had turned under to hold it in place for hemming. Also, so I could try the pants on to make certain I got the length correct. Normally, for sweat pants I would not go to this many steps, but I wanted to test my new method. It was a good thing I did, as well, because they were still 1/2 inch too long. So I removed the basting stitch, turned them up further, pinned and basted them again.
After estimating where I would need to place the pant leg in order to get a "deep" top-stitched hem, I taped the plastic guide to the machine using "delicate" 3M tape (like blue tape, only much less sticky and doesn't leave a residue. The tape used to be blue but is now lavendar.)
(Sorry about the reflection from the LED light strip I attached across the back of the machine -- it really helps me see much better.)
I butted the hem of the pants up against the plastic guide, and stitched.
In this photo you can see (L-R), the blue thread basting stitches, the first row of heming stitches, and I am just completing the second row of heming stitches.


No comments:
Post a Comment