Monday, April 8, 2019

Coated Nylon bags - Waterproof fabric


These bags are very easy to make.

First determine the size bag you want (width and depth).  For example, 6" x 9".  Then multiply the depth by 2 (i.e., 6" x 18").

Add 1-1/4" to each of these dimensions.  (i.e., 6-1/4" x 19-1/4").

For this size example, cut one piece of fabric 6-1/4" wide x 19-1/4".

Fold the strip of fabric in half (6-1/4" x aprx. 9.625") with the outside of the fabric towards in inner side.

Next step:  sew in your zipper with the zipper pull facing the outside of the fabric.  (Make a very short seam (about 1/4" long) on each end.  Sew the zipper into the space between the two short seams.  If your zipper is longer than the bag, that is okay -- possibly even preferable.

OPEN the zipper enough to be able to put your hand through to the inside (the outer fabric).  Then sew down each side.

When sewn, pull the bag out through the zipper so it is right side out. 

[Sorry, maybe next time I will take photos through the whole process and write it up properly.]
.
End result:

Monday, April 1, 2019

Geometrics make a cute top!

After much searching over a long period, I decided to make my own top.  I was fed up with wearing solid colors (mostly white and black) with very little variation.

Our local Benjamin Franklin store had a bolt-end of this fabric (I think it was just over a yard, but may have been less).

I had a top I quite liked, except I wanted it a couple inches longer.  So I made a paper pattern from the store-bought top (tricky to get right, but I did).  Laid the big print out to center a big "stripe" down the center front and the center back.

After cutting, I serged the shoulder seams and side seams.  Checked the fit -- it was good.  Pressed the seams.

Then I cut some fairly-diagonal strips to make a binding for the neck and armholes.  Stitched the strips and pressed the seams.  Then folded the strip and pinned it together.

NOTE:  In my opinion, it is ALWAYS tricky to stretch just the right amount when sewing binding to curves!  If you stretch too hard, you get crinkles around the curve in the garment.  If you do not stretch enough in the deeply curved areas, the binding will flop out like this:


Please note it is doing the flopping in the center front AND in the back as well where the curve was much more gentle.  (The sleeves came out well because you sewed the binding down, then turned the whole thing inside and stitched.)

I had zig-zagged around those curves, then serged the binding onto the top, then placed a row of stitching on the top to keep the binding flat.  (Until I stitched the top I could not be certain it was not acceptable).  Had I attempted to remove all those stitches I was certain the top would have become so distorted that it may never be okay.  So I came up with a "cheat"--I wasn't certain how it would work, but it did okay.  Now I just have to see how it wears over time.

My solution was to go into the front neck below the "cross-type" design.  I put in a thread on the back side, pulled it up through the binding, and put a row of stitches around the part of the neck that needed to be tightened.  I did the same thing on the back neck.  I sewed through to the inside of the neck fabric but no stitching goes through the outside layer.  With each stitch I pulled a little bit, trying to gauge how much I needed to reduce it by.


If you look closely on the back of the neck you can see the stitching where I pulled it just a little.  On the back I should have pulled it even a bit more, but it is okay.  The front came out acceptably.  I wish I had done it the right amount in the beginning, but this is an okay option.  I think you can hardly see the "puckering" around the front neck.  I wonder how it will wash???

[Better luck next time.]

Saturday, March 30, 2019

Sweet Pea wants a warm fuzzy "bankie"

My granddaughter loves sleeping under the lovely, soft, "throws" made from faux sheepskin on one side and deep fleece on the other.  They make over-size ones (i.e., a bit longer and wider), but I have been unable to find a twin size one.  She has outgrown the length of the throw.

After searching high and low for fabrics exactly like our great Costco throws, I gave up and purchased some very soft fleece for one side and some 'short, curly, furry fleece' for the other.

I bought 2-1/2 yards of each fabric.

I serged across the messy ends of both fabrics.  Then I washed them in the washer and dried each in the dryer just in case there might be any shrinkage.

I placed the outsides together and pinned them in place.  When pinning, I pulled the patterned fleece a tiny bit tighter than the curly one in order to keep the patterned fabric from showing on the curly side.  (I did not care that the curly one would show on the patterned side.  Then I serged around the edges, leaving about 12 inches open to turn it.

When I had turned them I was not surprised to see that the curly-type fabric had stretched out enough so as to make it wider on one end than the other fabric.  I turned it back out and on the side where it was too wide, I re-serged about half way down the side of the blanket--thus making another nice straight line with no excess.  (No need to remove previous serging.)

I turned the blanket again, matched up the opening and because of the curly fleece, I decided to blind-stitch the opening by hand.

I then laid the blanket flat and pinned all the way around the outside edge.  I then stitched a row about 1-1/2 inches from the edge all the way around (to keep it from rolling and balling up).

I was very tempted to put some more quilting-type stitches in the center to hold it all in place (it's pretty heavy and very slippery).  I decided NOT to do this because my granddaughter loves things that are all soft and fluffy--stitching might make it not quite so soft in that area.

Granddaughter had gone on vacation, leaving her sweet little lama with it's head on the pillow and under the throw.  So I placed the lama as she had, and put the blanket on the bed.

I intentionally did not make it all smooth and flat.


The back side looks almost like paw prints but is really little flowers.


Bottom line is:  she LOVES it!  (And I'm very glad, because that fabric cost a lot more than I thought it should._

Monday, January 7, 2019

Covering more pillows

I may have to be on break for a while again, so I'm posting this little chore for the day.

My daughter had purchased four pillows at IKEA, but the color was all wrong.

She found some material which pulled together her butter-yellow leather couch and chairs with her gray heathery couches.  It was a quick job; I did not make them removable for washing as by that time my daughter will likely want to replace them.  (IKEA fillings aren't going to last that long, and she likes to change things around.)

These will go on the couches with the "animal" pillows in a previous post.

It was an easy chore.  The most time consuming was getting the pieces cut out with the design centered and matched.

The fabric is quite nice (Waverly) and slightly loosely woven (which actually makes the job of turning corners easier).

  1. After cutting the pieces, I serged all the way around each piece as it tended to ravel.
  2. Then I put the two outsides together and sewed one long seam around the long sides and one end.  Stitched that seam twice.
  3. Trimmed the corners I had sewn.  
  4. Turned the case inside out.
  5. Pushed out the two corners until they were square.
  6. Inserted the pillow.
  7. Folded the seam allowance in on the open end and pinned it in place.
  8. Hand stitched across the open end, using a blind stitch.
  9. Repeat for the other three pillows.
  10. Done!
The photo only shows two of them.  All four are identical.


Should the need arise, I could pull out the blind stitches and remove the pillow. 

Wednesday, January 2, 2019

Making a shopping bag for France - on New Year's Day!

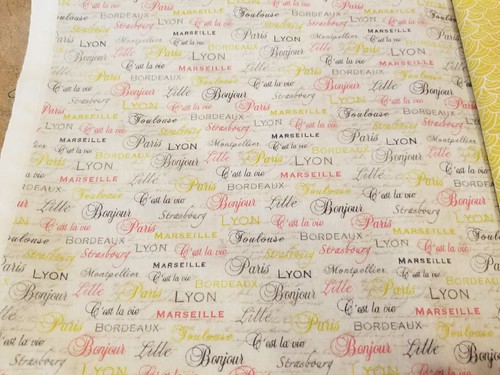
A dear friend of mine will be living in France for five months this summer.  When my daughter saw this cute, very topical fabric, she wanted to make a bag for her to take along.  So she bought this fabric, but there was never any time...


She also chose a nice solid grey for contrast, but we ended up not using it.  (And because, in the end, I opted to make a bag the size of a normal paper grocery store bag, I did not put in a zipper pocked.)

I had a pattern for a shopping bag to make from mesh (examples I have made are earlier in this blog).  I did not have a pattern which included a lined bag made of fabric.  I thought it through and fortunately it worked!  I used the softer version of webbing for the handles.  I also used two layers of good white cotton inside the base in hopes of giving it strength.

In addition, I wanted the whole thing to be washing machine friendly.

The pattern was one-way in each case, so I had to keep this in mind.  I sewed the two exterior pieces together, then the two pieces for the lining--making certain to leave a good 6-7 inches OPEN in that seam.  (Each piece was 20" long before sewing seams.  I simply trimmed about an inch down the side to get rid of the selvedge, and slit down the fold side.)  Then I sewed the strengthening white cotton onto the EXTERIOR fabric pieces (could not put it on the lining--that seam had to stay open.  Then I zig-zagged all around the edge of the white fabric to hold it firmly in place.

In order to make the lining, I sewed webbing straps on the outside fabric UP TO about 3 inches from the top of the bag, putting the overlap of the webbing in the center of the bottom of the bag.  (I always re-enforce the inch or so where the webbing overlaps.  For the webbing I used Metrozene thread and a size 14 needle.)

I then sewed the lining to the top of the bag, then sewed down each side to create the "sack", making certain not to sew through the straps at any point.   I then turned the whole thing (with its straps) to the outside (and it worked--yay!) and blind stitched the opening I had left in the lining.  I slipped the bag over the machine arm and zig-zagged a couple of inches of center bottom seam through all layers--to hold it all in place.

I then zig-zagged around the entire top of the bag before sewing the webbing straps the rest of the way to the top, reinforcing the webbing along the top edge of the bag in each case.

Then I sewed across the two bottom sides to create the "box".  The strengthening fabric I put into the bottom created quite a lump, so I cut across the ends, serged it, then zig-zagged the remainder to the bottom of the bag.  In order to make it easy to use and fold, I simply pressed a fold down all four sides.

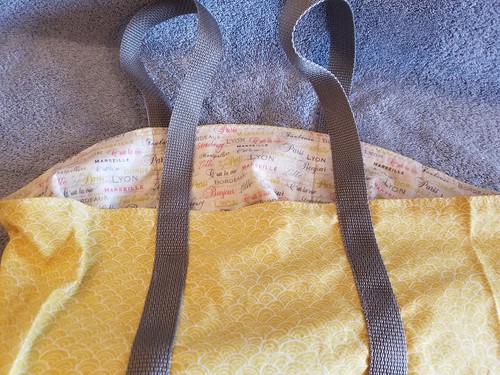
If this bag had been for me, the pattern would have gone on the outside, but we felt the recipient would prefer it the other way. 

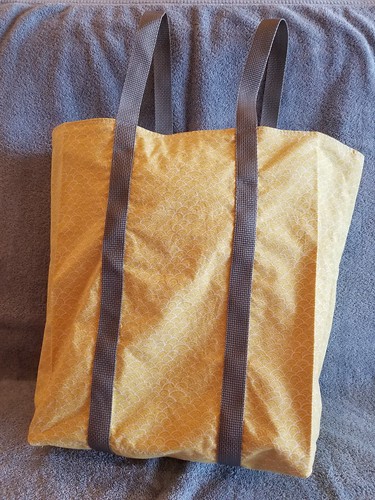
In this photo, the finished bag has a pillow in it and the webbing looks very ruckled.  It actually isn't ruckled:


Showing the inside and the outside of the top of the bag:


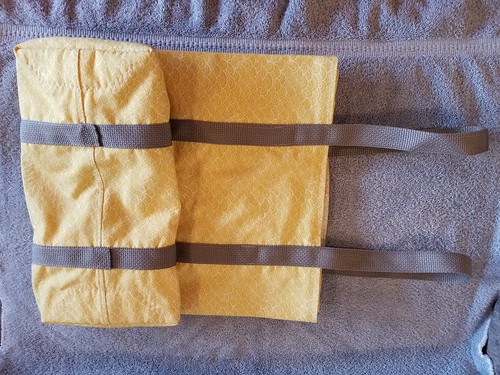
In this first fold you can see where I zig-zagged the sides down to the bottom and in the middle where I was stabilizing the center seam:
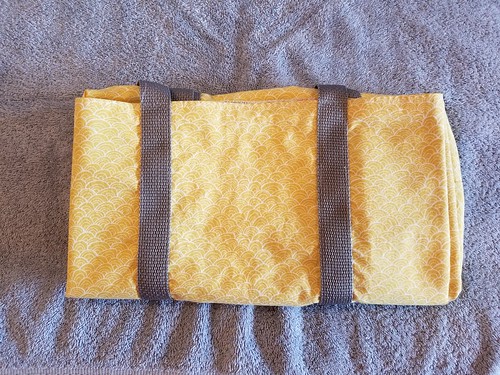

Next fold:


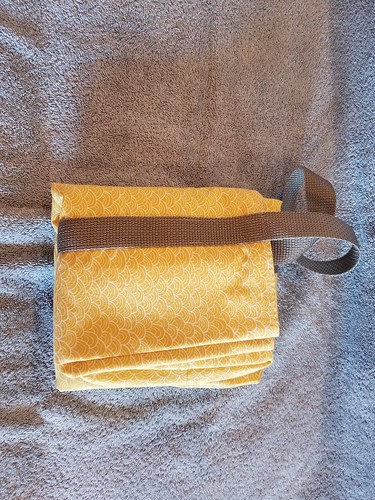
If desired it can also be folded one more time:


Due to the strength of the (quilting) fabric and the webbing straps, this is quite a strong bag.  It is probable that the strengthening fabric inside was not needed, but it has made it even stronger.  I am certain one can carry several bottles of wine and a loaf of bread home from the market in France!

----------

Postscript:

  • Should one think it might be okay to NOT have a seam down EACH SIDE of the bag; first of all, the one-way pattern prohibited that.  
  • But the MOST IMPORTANT reason, is that one MUST have a seam down both sides in order to be able to create a bag which can be turned inside out!


Making a "test" set of chair coverings from Pillowcases

For a long time I have needed to make something to cover up my good chair on a daily basis.  When I finally got it cleaned, it nearly ruined the fabric so this week (on the 1st day of January) I decided it was time to use some old pillow cases and make a trial set of coverings.

I will probably use them for a long time while I check their functionality, run them through the washing, and ponder what fabric I might consider making "real ones" from.  This process make take years!

I cut open the old pillow cases and sort of laid them on the bit of the chair I was working on, cut them large, sewed, and tested, re-sewed until they were like I wanted.  Then I serged the seams and hemmed.  There are four finished pieces:  chair back, each arm, and the seat.

Also, on the one for the back of the chair, I put two layers of cotton (sheet scraps from quilting)  underneath the pillow case for where oils tend to get on the back of one's head and ruin the upholstery.

You can see the extra layers on the chair back:


View from the behind the chair (this side is a much shorter piece as otherwise it simply dangles in the air.  Some refinement could occur in a finished design (of all parts); however, it cannot be a "snug fit" at the bottom as it would not be possible to slide it down over the top of the chair.